CategoryHow To

Superset Gitlab OAuth Integration

Finally cracked getting Superset to use Gitlab as an OAuth provider.

We had to make a custom Superset SecurityManager class – loans direct lenders uk

And then this is the superset_config.py, note that we load a custom security manager

Additionally I had to disable SSL certificate validation as we are using a self signed SSL certificate for our internal Gitlab installation. 

Android Bluetooth Barcode Scanner

As part of an Android contract role I am working on I needed to integrate a Bluetooth barcode scanner with my app, this scanner would be used to trigger events in the app. The first thing to work out was how to get data from the scanner into the app, I initially suspected I would need to deal with the Bluetooth stack directly but luckily this wasn’t the case.

All recent (from 2011 and onwards really) Android devices should support the HID standard as part of the Android Open Accessory Protocol 2.0 update. HID basically allows connected devices (USB and Bluetooth) to self describe the contents and types of their inputs, in general this means that connected devices can represent themselves as keyboard devices or specific hardware buttons.

In the case of Bluetooth scanners ensure that the device supports HID connections and also has the ability to send a line feed after each barcode is sent. The technology has improve with the years, and you can get Bluetooth in almost everything, without counting other technology improvements for a business such as the use of paycheck stubs to increase effectivity.

Coming back to our Android app, knowing what we do now, we can capture all key inputs to our activity in order to capture barcodes sent by the scanner.

Override an activities detault dispatchKeyEvent method with the above function. It takes all action down events, interprets the keycode using the KeyCharacterMap class and adds it to an internal buffer; once an enter key is detected this signals that our scanner has completed sending it’s information and can then trigger our handler.

As we capture all key press signals to our activity we need to reimplement some of the basic activity behaviour such as back key pressed, this is handled in the switch.

Fitbit Flex Bluetooth Syncing with HTC One X

Finally got Bluetooth syncing from my One X to my Fitbit Flex, here’s how –

First ensure that your phone has at least Android 4.3 or higher, in my case I’m running Cyanogenmod 10.2, then head to this link to sign up for the Fitbit Beta – https://groups.google.com/forum/#%21forum/fitbit-android-sync-beta. Once you sign up to for beta access it may take around ten minutes for this to register with Google, then an update to the Fitbit application will be available on your phone.

After the update ensure that Bluetooth is active and enjoy your wireless syncing!

The Python Subprocess module is a highly flexible way of running background processes in Python. Here are two functions that show how to run external shell commands, one will wait for the command to return and the other runs in the background allowing the controlling script to stop it as required.

Passing unsanitized input to these functions will not end well.


Monit: Failed to change UID

Monit is an excellent monitoring and process management tool, it has a huge array of features in its custom syntax, one option is to run programs as a specific user, for example –

I recently had trouble getting Monit to correctly change the UID and GID of an application, there was very little error messages available but restarting it with the -v flag showed me ‘Failed to change UID’.

It took much guess work to find the solution to this problem which turned out to be that SELinux was enabled. Disabling SELinux in /etc/selinux/config solved it. I assume there could be some better way of configuring SELinux to handle Monit’s requests to change UID but as this is an internal test system it doesn’t matter.

Compare Lists in C# Unit Tests

A small thing that caught me out today, while writing a unit test for C# I wanted to check that a list was returned in the expected order and used Assert.AreEqual to compare them, this kept failing despite the two lists being exactly the same.

It turns out that there is a separate CollectionsAssert class that is to be used for lists or any form of C# collection and that is due to the List<T> class not overriding the Equals method, the AreEqual function will just check the references instead.

Here is an example of a working unit test comparing two lists.


Unit Testing and Code Coverage Results in Jenkins CI

Unit testing is great, code coverage is great and continuous integration servers are great; but what isn’t great is combining all three into something useful!

If you are coding in Java then code coverage is fantastically simple but what if you use C++ and GoogleTest and want the same level of graphification? Luckily it is also simple if you know how – so you’re in the right place.

The scenario here is that you have a C++ project being built on a Jenkins/Hudson continuous integration setup and you also use Google Test for your unit tests. The software required for this is GCC 4.7 which should contain a tool called gcov, this will create the actual coverage files for your executable but will require some additional linker and library options to be added to your build scripts or make files. The final piece of software required is called gcovr, this is a Python script that is designed to read the output files from gcov linked executables and convert it into an XML format that can be read by the Cobertura plugin in Jenkins/Hudson.

It is a good idea to add a separate make target for coverage as it requires the executables to be built with no optimisation and a lot of debug symbols, so not very useful for production environments.

Add the following to your CPPFLAGS –

And this to your LDFLAGS

So for example you could have a section in your makefile that looks like this (assuming the test target builds your unit test.) –

After you have run the coverage build target you then have to run the test executable, this generates .gcov files that describe which lines of code are covered and by what functions.

Then ensure that you can access the gcovr script and run it with the following arguments –

The –gcov_exlcude will remove any unnecessary parsing of files from the GoogleTest framework. The output is placed into the coverage.xml file which can then be accessed from Jenkins by adding a new Post-Build Action from the job configuration page.

Creating An RPM From Tar File

RPM packages are a great way of packaging and distributing software, unfortunately some stand alone software is distributed as a zip or tar file to be installed that way. By converting these into an RPM you can use your package manager as a distribution and removal tool. For this example we will be creating an RPM for the Example Software.

  • The first thing to do is install the RPM development tools, you should only require rpmbuild.
  • Create a folder to be used as a RPM development area and then create a file called .rpmmacros in your home folder that contains the following line: %_topdir <your build folder>
  • Set up your RPM build area by creating the following folders – BUILD BUILDROOT RPMS SOURCES SPECS SRPMS
  • Get a copy of your tar.gz or zipped software and place it in the SOURCES directory.
  • Now the key part of this is to create the .spec file as this describes the build and installation part of the RPM.
  • Create a new file in the SPECS folder called example.spec, fill it out with the following information –

  •  After your spec file is created run rpmbuild -bb ./SPECS/example.spec – fix any errors that are produced, most likely problems will come from getting the correct version/name and target architecture.
  • Find your completed RPM in ./RPMS/<ARCH>

Done!


Unit Testing C# With Data in Visual Studio 2012

When writing unit tests it is likely you will  need to include some additional input files containing data or settings etc. If you’re trying to include some data for a C# unit test and are using Visual Studio 2012 follow this guide –

  1. Add a separate folder for data to the project then ‘add an existing item’ and select your files.
  2. In the Solution Explorer, navigate to your newly added file, right click and go to properties.
  3. Set ‘Copy to Output Directory’ to an appropriate option.
  4. When you want to use this data in a unit test add the following before the function – [DeploymentItem(“Data”, “Data”)]

The line in the last step will copy all data from Data in your build directory to the a new folder in the test directory.

I presume that these instructions will apply to older versions of Visual Studio.


Linux Mint on VirtualBox – Enable 3D Acceleration

Just spent a bit of time installing the latest Linux Mint (14.1) on VirtualBox and struggling to get the VirtualBox 3D acceleration to work correctly. This causes the window manager to fall back to software rendering (yuk); to see if your machine is currently using software rendering run inxi -G and check for Gallium 0.4 on llvmpipe (LLVM 0x300).

To get the full 3D acceleration from VirtualBox ensure that 3D acceleration has been enabled from the settings menu and a decent amount of video RAM is available, I have it running quite well with 56MB of RAM. Load up Linux Mint and install the VirtualBox additions from the devices menu. Ignore the warnings about it already being installed and carry on. Reboot the virtual box and run inxi -G again, it should now show something similar to this –

Graphics: Card: InnoTek Systemberatung VirtualBox Graphics Adapter
X.Org: 1.13.0 drivers: ati,vboxvideo (unloaded: fbdev,vesa) Resolution: 1920×1200@60.0hz
GLX Renderer: Chromium GLX Version: 2.1 Chromium 1.9

I only get this problem on a fresh install of Linux Mint. It’s supposed to be bundled with the VirtualBox guest additions but I guess they don’t always work as they should.

Create Notification Bubbles In Gnome

If you’ve ever been leaving something to run in a terminal and wanted a way of alerting yourself that it has finished AND you run gnome then I have the perfect solution. Have you noticed the little black notification bubbles that appear at the top right of the screen to tell you about things such as emails and the like? Well you can very easily make your own notifications by installing libnotify-bin. You will now have a program called notify-send.

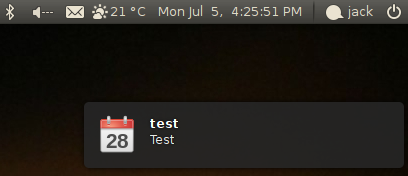
The most basic command is notify-send “test” “Test” which will give you the following –

This program can also allow you to specify icons for this notification too, for example the command notify-send -i calendar “test” “Test” will give you this –

There are plenty of other options in there but it is a very nifty and useful thing to have installed.

© 2024 Acodemics

Theme by Anders NorénUp ↑